
Choosing the Right Location and Measuring Your Window
Before fitting Metal Venetian Blinds, selecting the correct position and measuring accurately is essential. This ensures your blinds function perfectly and enhance your room’s look.
Start by deciding whether you want to mount your blinds inside the window recess or outside it. Inside mounts are best for a seamless, built-in appearance and are suitable for windows with sufficient recess depth. Outside mounts can enhance the perception of window size, conceal unattractive frames, or allow more light in when fully opened. Once you’ve determined the fitting style, use a reliable steel tape measure to gather your window measurements precisely. Always take the width and drop in multiple places and use the smallest value for the best fit if your window isn’t perfectly square. Correct and precise measurement ensures a clean, tailored finish and avoids inefficient operation of the blind slats.
Additionally, always double-check your measurements before placing a blinds order. Write everything down clearly, noting whether the dimensions are for a recess or exact fit installation. Even the slightest variance in width can result in poor coverage or allow too much light bleed around the edges. For convenience, Impress Blinds also offers convenient measuring guides on product pages like their Metal Venetian Blinds range, making the task easier for novice DIY enthusiasts and ensuring instructions follow British window standards.
For homeowners in the UK, weatherproofing can also be a consideration—particularly in conservatories or kitchens. In those instances, it’s worth noting products that offer moisture resistance or go for water-resistant variants like Conservatory Blinds by Impress Blinds for rooms prone to humidity. Once size and type are sorted, it’s time to prep for installation.
Gathering the Right Tools for Installation
Once measurements are sorted, the next step is making sure you have the correct tools at hand. Having what you need ready before installation can save you significant time.
To fit Metal Venetian Blinds properly, you typically need just a few everyday DIY tools: a pencil for marking, a tape measure, a screwdriver or power drill, wall plugs if fitting into masonry, and a spirit level. Additional tools such as a small hacksaw might be helpful if you need to trim valances or shorten the headrail, although it’s always best to order custom-fitted blinds to avoid alterations. A dustsheet might also help keep your workspace clean, especially when drilling through plaster or masonry walls in older UK properties.
Your mounting surface type determines the fixings you require. For instance, plasterboard walls may require toggle bolts for security, whereas wooden windows might accommodate regular screws without plugs. Brand-new blinds from Impress Blinds include everything you need for installation, such as mounting brackets and detailed fitting instructions. Still, having your tools prepared in advance is ideal, especially in older UK homes where different construction materials may be in play.
Also, ensure adequate lighting in the room you’re working in. Precision drilling and aligning brackets become more difficult in dimly lit conditions, which may lead to improper alignment or weak support structures. Having the right tools not only streamlines the blinds installation process but also ensures your blinds hang level, operate smoothly, and stay securely attached for years to come.
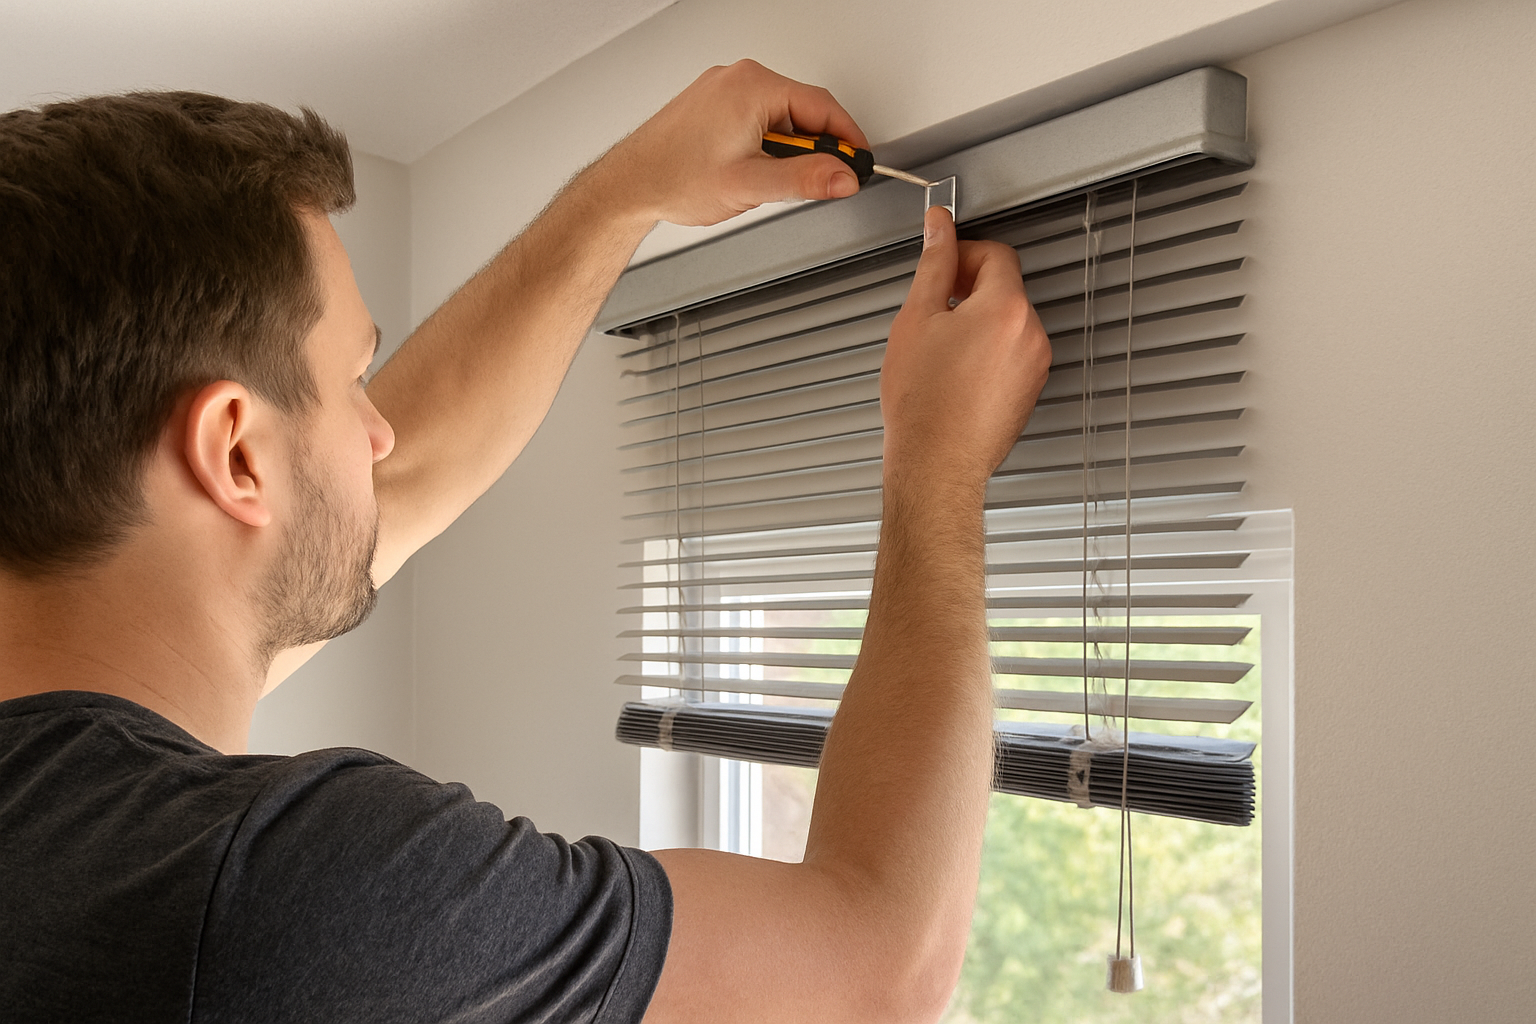
Marking and Installing the Mounting Brackets
This is where precision is critical. The mounting brackets are what hold the entire structure of your blinds in place. Mark their positions carefully.
Hold the brackets where you want your Metal Venetian Blind to sit. Use a spirit level to confirm horizontal alignment, then lightly pencil mark the screw holes on either side. Always measure and mark from the same reference point, whether that’s the top edge of the window recess or a central line in an exterior mount position. This keeps everything symmetrical and ensures the blinds function without tilting. For inside mounts, affix brackets to the top frame of the recessed window; for outside mounts, place them slightly above the window to allow for better light control and aesthetics.
Once marked, begin drilling pilot holes using a bit appropriate to the surface—masonry, wood, or metal—then insert wall plugs if securing into plaster or brick surfaces. The brackets need to be snug and flush to the wall or recess, allowing the blind to clip in properly. Uneven brackets could cause difficulty when operating the lift or tilt mechanisms.
Double-check bracket placement after installation. Even a slight misalignment can result in blinds that tilt improperly or become hard to operate. For larger blinds, consider installing a centre support bracket to prevent sag across the length of the headrail. It’s a small addition but essential for wide coverings where metal components can bow over time.
Good bracket placement helps your blinds last longer and look refined. Impress Blinds’ Metal Venetian Blinds come with strong clip-in mechanisms and easy-to-follow instructions for streamlined DIY assembly, perfect for even first-time installers settling in UK homes.
Securing the Headrail and Attaching the Blind
With your brackets fixed, it’s time to install the headrail. This component is the control centre of your blind—be cautious and methodical during this step.
Slide the headrail into the metal brackets and ensure it clicks or locks into place, depending on the design of your blinds. Make sure the mechanism for tilting and lifting is facing outwards and not obstructed by the wall or window finishes. When installing larger blinds, this step might be easier with a second pair of hands, especially to align the headrail evenly along both sides. A loosely fixed or angled headrail often leads to uneven blind operation and excess wear on moving components.
Once the headrail is locked in, you can begin attaching the blind slats, if they’re not pre-assembled. Most Metal Venetian Blinds come pre-threaded, but in some custom installations, this may not be the case. Install the valance or pelmet next, giving the top of your blind a tidy, engineered finish that complements any interior—from traditional to contemporary UK homes. The valance often slides into thin metal clips or magnets that secure it stylishly without visible fasteners.
Lastly, check all the cords and mechanisms work smoothly without obstruction. Operate the tilt wand or cord several times to test functionality. If there are catches or kinks, troubleshoot immediately to prevent long-term wear. A well-mounted blind not only looks sleek but provides dependable light control and privacy every time you require it. For customers preferring other modern options, Roller Blinds from Impress Blinds offer functional and minimalist alternatives with easy installation as well.
Testing Operation and Making Final Adjustments
This is where it all comes together. Testing and adjusting ensures your blinds don’t just look right—they work right too.
Raise and lower the blinds completely several times. Check that they stay aligned and that the slats stack neatly at the top when fully raised. Using the tilt function, run through several open and close cycles to make sure nothing sticks or operates unevenly. If you hear unusual clicking or snapping sounds, it could be due to poorly aligned slats or a skewed headrail. Make minor adjustments as needed—sometimes a light nudge will correct small misalignments in the rail or brackets.
Check your cord lengths to ensure they’re comfortable yet child safe. UK safety regulations insist that cords should be secured with cleats or tension devices—especially in homes with children or pets. Install any child-safety features included with your blinds following the manufacturer’s placement guidelines, typically 1.5 metres from the floor. This is not just about regulatory compliance but also about protecting household safety comprehensively.
Once you’ve confirmed everything operates seamlessly, give the blinds a final dust or clean to remove fingerprints, packaging residue, or dust from drilling. The best way to maintain their sleek appearance is by cleaning gently with a microfibre cloth weekly. Smooth operation paired with spot-on aesthetics is what transforms your installation from functional to fabulous. If you ever feel unsure during this final step, consider browsing Impress Blinds’ thorough installation resources or consult their guidance team for a walkthrough.
Troubleshooting Common Installation Issues
- Slats Not Tilting Properly: Check the tilt wand connection. It may not be properly seated or could be disconnected during installation.
- Blind Doesn’t Raise Evenly: Re-align the cords in the internal headrail mechanism. One side may have too much slack.
- Brackets Don’t Fit Securely: Replace wall plugs or try longer screws to reach firmer plaster or wood behind drywall.
- Headrail Bowing: Install a centre bracket or switch to a lighter blind if required for extra-wide windows.
- Child Safety Device Missing: Contact your blind supplier; UK law mandates secured cords for all installations post-2014.
- Slats Not Hanging Straight: Pull the blind fully down and tilt fully both ways a few times to reset alignment manually.
Maintenance Tips to Keep Your Blinds Looking New
Even the highest quality Metal Venetian Blinds need routine maintenance